




(Photo by Rushikesh Gaikwad)
Today, I’ll take a deep, deep dive into transforming a single-tenant application into a multi-tenant white label platform without breaking everything. This post covers technical design with real code examples.
When I first launched Newroots.ai, I thought I was building a simple product. An AI-powered relocation advisor that helps people figure out where they might thrive based on their life circumstances and values, then matches that to countries that would actually welcome them. The system builds a psychometric profile across 150+ cultural and lifestyle dimensions, compares that to countries around the world, and filters results based on real-time immigration and visa data. The output is a beautifully typeset, hyper-personalized relocation report—each as unique as the person and their journey. The Bronze version usually clocks in around 50 pages, the Silver 120 pages, and the Gold about 220 pages. Again, all specifically tailored for the individual. (Feel free to read what a sample silver report looks like.)
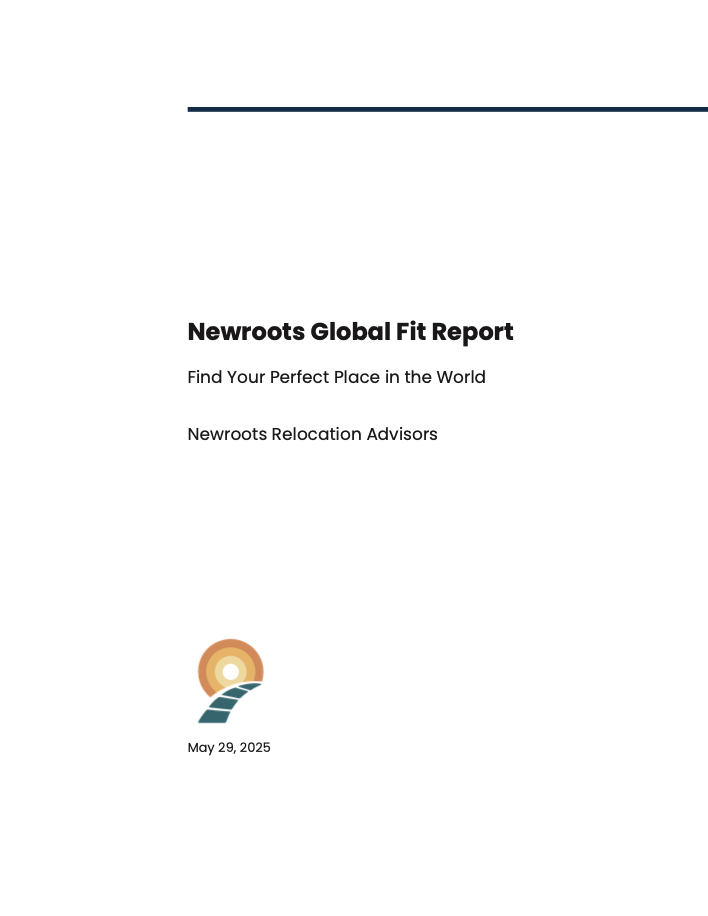
The early feedback was encouraging. Users described the reports as "insightful," "encouraging," and "surprisingly fun to read." One industry leader called it "the best I've ever seen." Another dubbed it "the Expatsi test on steroids." That kind of response opened doors I hadn't expected. Other platforms wanted to offer the same reports—but under their own brand.
Suddenly, I found myself facing a classic software challenge: how do you take a single-brand product and make it work for multiple brands without duplicating your entire codebase? And how do you do it fast enough to capitalize on the opportunity before it disappears?
I had one week to figure it out.
This is the story of how I transformed Newroots from a single-brand product into a fully white label system. My goal was to make the entire experience—frontend, backend, reports, and emails—tenant-aware and dynamic, all without duplicating the codebase or painting myself into a corner. It needed to be fast, maintainable, and clean enough to hold up in production.
Sidebar. If you haven't heard the term before, white labeling just means making a product look like it was made by someone else. You build the thing—but someone else puts their name, logo, and branding on it. Like when your local grocery store sells "their" peanut butter, but it was actually made by a giant food manufacturer. Same peanut butter, different label.
In software, this usually means swapping out logos, colors, links, and maybe support emails—so the experience looks and feels like it was built by the client. But doing that well and cleanly across multiple layers of a system is harder than it sounds. And just to be clear: there's nothing shady about it. White labeling is totally legitimate. It's common in everything from software to snacks. The client gets a product tailored to their brand; you get to scale your tech without reinventing the wheel every time.
The challenge was architectural. When someone visits newroots.ai, they should see exactly what I originally built. But if they visit a different domain—say, expatsigo.com—they should see a site that looks and feels entirely like Expatsi built it. And when they buy a Global Fit Report, that report should be fully branded as if it came from Expatsi. The user experience should be seamless, but the technical implementation should be maintainable.
Why does this matter? Because Expatsi already has brand recognition, an audience, and a reputation. I'm not looking to compete with that. I just want to help people figure out where they could live, thrive, and enjoy their lives. If that happens through another brand, great. I'm happy to be behind the curtain.
But here's the thing about building systems under pressure: you have to make smart trade-offs. Perfect is the enemy of shipped. I needed something that worked reliably in production, could handle multiple tenants cleanly, and wouldn't require a complete rewrite six months later when the next partner came along. The architecture had to be solid, but it didn't need to solve every theoretical edge case on day one.
This post walks through exactly how I pulled that off. I'll show you the architectural decisions, the code that made it work, the testing that proved it was solid, and the lessons I learned along the way. Some of these lessons were technical—how to handle tenant detection, how to inject dynamic branding, how to avoid data leakage between tenants. Others were more strategic—when to optimize for speed versus perfection, how to build systems that can evolve, and why clean abstractions matter even when you're moving fast.
The result was a system that could serve multiple brands from a single codebase, with each tenant getting their own fully branded experience from frontend to PDF reports to email notifications. It shipped on time, worked in production, and set the foundation for scaling to additional partners in the future.
Defining the Requirements
Before diving into code, I needed to be crystal clear about what success looked like. The temptation when you're under time pressure is to start coding immediately, but that's a mistake. Spending an hour upfront defining requirements can save you days of rework later. Always start by defining what you want to build, what problem you are trying to solve.
Here's what I knew had to work: when someone visits a partner's domain, they should get a completely branded experience that feels native to that partner. No "powered by Newroots" footers, no leaked branding, no half-measures. The user should never know they're interacting with my underlying platform.
But I also knew what I couldn't afford to build. I couldn't maintain separate codebases for each partner. I couldn't deploy multiple versions of the application. I couldn't build a system so complex that adding a new tenant required weeks of engineering work. The architecture had to be elegant enough to scale without becoming a maintenance nightmare.
So I laid down a few non-negotiables. First, one frontend that could dynamically theme itself based on the domain. No separate builds, no separate deployments, no branching strategies that would make my head spin six months later. The same React application had to serve both newroots.ai and expatsigo.com, but look completely different depending on who was visiting.
Second, one backend that could route requests appropriately and generate tenant-specific content. The same FastAPI application had to handle authentication, report generation, and email delivery for all tenants, but with complete data isolation and branding separation. No shared state that could leak between tenants, no configuration that could get mixed up under load.
Third, I wanted to reuse my existing CI/CD pipelines. I'd already spent time getting deployment right for Newroots, and I didn't want to rebuild that infrastructure for a white label system. The same Docker containers, the same deployment scripts, the same monitoring and logging should work for all tenants.
Fourth, tenant detection had to be automatic and reliable. I couldn't ask users to manually specify which brand they wanted to interact with. The system had to figure out which tenant they were trying to reach just from their visit, and it had to do it fast enough that the user experience didn't suffer.
Fifth, reports and emails had to reflect the right brand end to end. This was non-negotiable. If someone bought a report through Expatsi, that PDF should look like it came from Expatsi—logo, colors, fonts, contact information, everything. Same with emails. A user who bought through a partner should never receive an email with Newroots branding.
Sixth, payments had to be attributed correctly. Stripe purchases and fulfillments had to be linked to the correct tenant for accounting, analytics, and customer support. I needed to be able to answer questions like "how many reports did Expatsi sell last month?" without digging through logs.
Finally, analytics had to clearly separate which brand was responsible for what. Each tenant should be able to track their own conversion rates, user engagement, and report generation without seeing data from other tenants. Clean separation was essential for both business intelligence and privacy.
The core technical challenge was tenant detection. Everything else flowed from that. If I could reliably determine which tenant someone was trying to reach, I could load the right configuration, apply the right branding, and generate the right content. But if tenant detection was flaky or slow, the entire system would feel broken.
I considered several approaches. I could use subdomains—newroots.newroots.ai versus expatsi.newroots.ai. But that is clunky and didn't give partners the clean branding they wanted. I could use URL parameters—newroots.ai?tenant=expatsi. But that was just as bad from a user experience perspective.
The cleanest approach was domain-based detection. Each tenant would have their own domain, and the system would inspect the incoming request to determine which tenant was being accessed. This meant I needed a way to map domains to tenant configurations, and I needed that mapping to be fast and reliable.
I also had to think about edge cases. What happens when someone accesses the system from an unknown domain? What happens when the tenant configuration is missing or malformed? What happens when the database is unavailable during tenant lookup? The system had to degrade gracefully and provide useful error messages when things went wrong.
Performance was another consideration. Tenant detection happens on every request, so it had to be fast. I couldn't afford to make database queries on every page load just to figure out which tenant someone was trying to reach. The tenant configuration had to be cached intelligently and updated efficiently when changes were made.
Security was critical too. I couldn't allow one tenant to access another tenant's data, even accidentally. The system had to enforce strict data isolation at every layer—database queries, file access, email delivery, everything. A bug that leaked data between tenants would be catastrophic for trust and potentially illegal depending on the data involved.
Finally, I had to think about the developer experience. Adding a new tenant should be straightforward—upload some assets, add a configuration entry, maybe update DNS. It shouldn't require code changes, database migrations, or deployment downtime. The system had to be designed so that business operations could handle tenant onboarding without engineering involvement.
These requirements shaped every architectural decision that followed. They forced me to think about abstractions, interfaces, and separation of concerns from the beginning. They also helped me prioritize what to build first and what could wait for a future iteration.
Frontend Architecture: Domain-Based Tenant Detection
The frontend was where users would first experience the white label magic, so it had to be bulletproof. The core challenge was this: how do I know which tenant someone is trying to reach just from their visit? If I can detect that reliably, I can load the right tenant-specific configuration before rendering anything.
The original Newroots.ai homepage with purple branding and nature imagery:

The white labeled site:

The same system serving ExpatsiGo.com with completely different branding - teal colors, lighthouse imagery, and Expatsi logo
The screenshots above show the white label system in action. Both sites use identical underlying code, but the tenant detection system automatically applies different branding, colors, logos, and even background images based on the domain being accessed. This is the power of the architecture we're about to explore.
The solution was surprisingly elegant. I wrote a small middleware function that looks at the Host header of the incoming HTTP request. From that, I can figure out which domain—and therefore which tenant—is trying to load the app.
export function getTenantFromRequest(request: Request): TenantConfig {
  const host = request.headers.get('host');
  if (!host) return DEFAULT_TENANT;

  const hostname = host.split(':')[0];

  if (TENANT_CONFIGS[hostname]) {
    return TENANT_CONFIGS[hostname];
  }

  for (const [domain, config] of Object.entries(TENANT_CONFIGS)) {
    if (hostname.endsWith(domain) || hostname.includes(domain)) {
      return config;
    }
  }

  return DEFAULT_TENANT;
}
This function does exactly what you'd expect. It extracts the hostname from the request, strips off any port information, and looks up the corresponding tenant configuration. If it can't find a match, it falls back to the default tenant. Simple, fast, and reliable.
But the real magic happens in the tenant configuration itself. Each tenant in the system is described by a comprehensive TenantConfig object that controls everything from branding to theming to route visibility and analytics. First, we define an interface:
export interface TenantConfig {
  id: string;
  name: string;
  domain: string;
  logoUrl: string;
  faviconUrl: string;
  themeName: string;
  fonts: {
    hero: string;
    body: string;
  };
  colors: {
    primary: string;
    secondary: string;
    accent: string;
    neutral: string;
    base100: string;
    base200: string;
    base300: string;
    baseContent: string;
    info: string;
    success: string;
    warning: string;
    error: string;
  };
  social: {
    twitter?: string;
    instagram?: string;
    linkedin?: string;
  };
  contact: {
    email?: string;
  };
  analytics: {
    gtmId?: string;
    gaId?: string;
  };
  enabledRoutes: {
    about?: boolean;
    partners?: boolean;
    support?: boolean;
    providers?: boolean;
  };
}
This interface captures everything needed to render a completely branded experience. The theme name is used as a CSS data-theme attribute so DaisyUI can style everything from buttons to modals accordingly. Route flags let me toggle things like "About Us" pages on or off depending on the brand's needs. Analytics IDs ensure that each tenant gets their own tracking data.
Here's what a representative tenant configuration might look like in practice:
export const TENANT_CONFIGS: Record<string, TenantConfig> = {
  'expatsigo.com': {
    id: 'expatsigo',
    name: 'ExpatsiGo',
    domain: 'expatsigo.com',
    logoUrl: '/tenants/expatsigo/logo-expatsigo.png',
    faviconUrl: '/tenants/expatsigo/favicon.png',
    themeName: 'expatsigo',
    fonts: {
      hero: 'Lobster, sans-serif',
      body: 'Open Sans, sans-serif',
    },
    colors: {
      primary: 'oklch(72% 0.13 220)',
      secondary: 'oklch(62% 0.22 25)',
      accent: 'oklch(70% 0.15 180)',
      neutral: 'oklch(45% 0.03 240)',
      base100: 'oklch(98% 0.01 185)',
      base200: 'oklch(94% 0.02 185)',
      base300: 'oklch(90% 0.03 185)',
      baseContent: 'oklch(20% 0.05 240)',
      info: 'oklch(70% 0.2 220)',
      success: 'oklch(65% 0.25 140)',
      warning: 'oklch(80% 0.25 80)',
      error: 'oklch(62% 0.22 25)',
    },
    social: {
      twitter: 'https://twitter.com/expatsigo',
      linkedin: 'https://linkedin.com/company/expatsigo',
    },
    contact: {
      email: 'support@expatsigo.com',
    },
    analytics: {
      gtmId: 'GTM-XXXXXXX',
      gaId: 'G-YYYYYYYYYY',
    },
    enabledRoutes: {
      about: false,
      partners: false,
      support: true,
      providers: true,
    },
  }
};
Each domain points to its tenant configuration, and each configuration has enough metadata to render the entire site, style the theme, inject analytics, and populate contact information. This approach makes it trivial to spin up new tenants. Just add a configuration, upload your assets, and everything else works out of the box.
Once the tenant is identified, I inject it into a global React context that wraps the entire application. That way, every component can access tenant-specific information without worrying about how it was resolved.
export const AppProvider = ({ children }: { children: ReactNode }) => {
  return (
    <TenantProvider>
      <ThemeProvider>
        <NavigationProvider>
          <CountryProvider>
            <AuthProvider>
              <ProductProvider>
                <OnboardingProvider>
                  <StripeProvider>{children}</StripeProvider>
                </OnboardingProvider>
              </ProductProvider>
            </AuthProvider>
          </CountryProvider>
        </NavigationProvider>
      </ThemeProvider>
    </TenantProvider>
  );
};
(Pew-pew — that looks like a starfighter from afar.)
The TenantProvider sits at the top of the context hierarchy, making tenant information available to every component in the application. This is crucial because branding decisions affect everything from the header logo to the footer links to the color of form buttons.
The real magic happens in the dynamic theme injection. Each tenant defines their own theme and style variables—colors, fonts, favicons, and so on. When the app loads, I inject those into the DOM and apply them at runtime.
const injectTenantTheme = (tenantConfig: TenantConfig, darkMode = false) => {
  const existingStyle = document.getElementById("tenant-theme-styles");
  if (existingStyle) existingStyle.remove();

  const styleElement = document.createElement("style");
  styleElement.id = "tenant-theme-styles";
  styleElement.textContent = generateTenantThemeCSS(tenantConfig);
  document.head.appendChild(styleElement);

  const themeName = darkMode ? `${tenantConfig.themeName}-dark` : tenantConfig.themeName;
  document.documentElement.setAttribute("data-theme", themeName);
  document.documentElement.setAttribute("data-tenant-theme", tenantConfig.themeName);

  document.documentElement.style.setProperty("--font-hero", tenantConfig.fonts.hero);
  document.documentElement.style.setProperty("--font-body", tenantConfig.fonts.body);

  const faviconLink = document.querySelector("link[rel*='icon']") as HTMLLinkElement;
  if (faviconLink) faviconLink.href = tenantConfig.faviconUrl;

  document.title = tenantConfig.name;
};
This function does several important things. It removes any existing tenant styles to prevent conflicts, generates new CSS based on the tenant configuration, injects that CSS into the document head, sets the appropriate data-theme attribute for DaisyUI, configures custom font properties, updates the favicon, and sets the document title. The result is that the same React application can look completely different depending on which domain is being accessed.
To trigger this logic, I simply check the window.location.hostname on load. Based on that, I fetch and apply the corresponding tenant configuration.
useEffect(() => {
  const currentHost = window.location.hostname;
  const detectedTenant = getTenantFromHost(currentHost);

  setTenant(detectedTenant);
  injectTenantTheme(detectedTenant, isDarkMode);
  setIsLoading(false);
}, [isDarkMode]);
This approach has several advantages. First, it's fast. Tenant detection happens synchronously during application initialization, so there's no loading delay or flash of unstyled content. Second, it's reliable. The tenant configuration is baked into the application bundle, so there are no network requests that could fail. Third, it's maintainable. Adding a new tenant requires updating a single configuration file and uploading some assets.
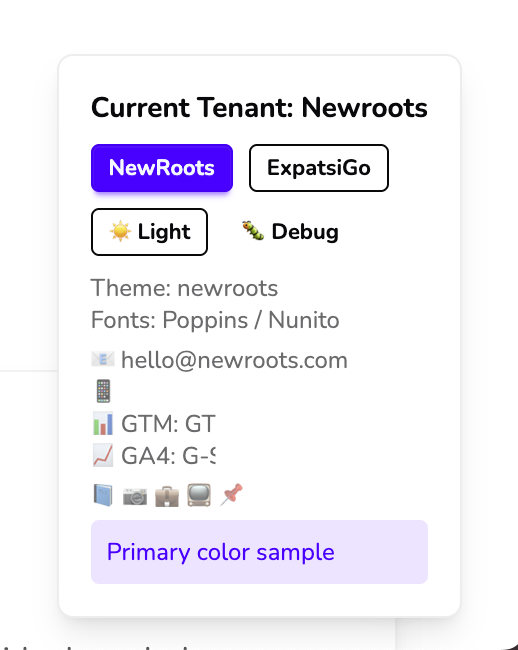
To make development easier, I also built a simple UI component for switching tenants manually during local development. This lets me simulate different domains without needing to deploy or mess with my hosts file.
export const TenantDemo: React.FC = () => {
  const { tenant, isDarkMode, switchTenant, toggleDarkMode } = useTenant();
  const isDevelopment = import.meta.env.DEV || window.location.hostname === 'localhost';
  if (!isDevelopment) return null;

  return (
    <div className="fixed bottom-4 right-4 bg-base-100 p-4 rounded-lg border">
      <h4>Current Tenant: {tenant.name}</h4>
      <button onClick={() => switchTenant('localhost')}>Newroots</button>
      <button onClick={() => switchTenant('expatsigo.com')}>ExpatsiGo</button>
      <button onClick={toggleDarkMode}>{isDarkMode ? '🌙' : '☀️'}</button>
    </div>
  );
};
This development tool was invaluable during implementation. I could quickly switch between tenant configurations to test branding, verify that colors were applied correctly, and ensure that features like route visibility worked as expected. Here’s a quick screenshot; this (much smaller in real life) component hides in the corner of the page. I can test themes just by clicking.
The frontend architecture had to handle one more critical requirement: dark mode support per tenant. Each tenant could define both light and dark color schemes, and the system had to persist the user's preference across sessions while respecting the tenant-specific styling.
const toggleDarkMode = () => {
  const newDarkMode = !isDarkMode;
  setIsDarkMode(newDarkMode);
  localStorage.setItem(`darkMode_${tenant.id}`, newDarkMode.toString());
  injectTenantTheme(tenant, newDarkMode);
};
By storing dark mode preferences per tenant ID, users can have different theme preferences for different brands they interact with. This attention to detail makes the white label experience feel more authentic and polished.
Some key takeaways from this frontend approach: the TenantProvider wraps the entire application and makes tenant information globally available. Tenant detection is automatic and based on domain inspection. Themes and styles are injected dynamically using DaisyUI's data-theme system. Each tenant can define comprehensive branding including fonts, colors, and favicons. Dark mode support is per-tenant and persisted via localStorage. Development tools make it easy to test different tenant configurations locally.
With all of this in place, the same React application can cleanly serve different branded experiences just by inspecting the domain name. The user never knows they're interacting with a multi-tenant system—they just see a beautifully branded application that feels native to the partner they're working with.
Backend Architecture: Tenant-Aware Services
The backend had to be just as tenant-aware as the frontend, but with additional complexity around data isolation, report generation, and email delivery. The challenge was ensuring that every API request could be properly attributed to a tenant while maintaining clean separation between tenant data.
When the frontend sends a request to the backend, I had a couple of options for tenant identification. The frontend could pass along the tenant ID in each API request, or the backend could inspect the HTTP Origin header to determine which domain initiated the request. I chose the Origin header approach because it's more secure and harder to spoof accidentally.
In FastAPI, this looks like a custom middleware that handles tenant-aware CORS and request routing:
"""
Custom middleware for multi-tenant CORS handling.
"""

from fastapi import Request, Response
from starlette.middleware.base import BaseHTTPMiddleware
from starlette.responses import PlainTextResponse
from app.core.tenant import tenant_manager
import logging

logger = logging.getLogger(__name__)

class TenantAwareCORSMiddleware(BaseHTTPMiddleware):
    """
    CORS middleware that dynamically determines allowed origins based on tenant domain.
    """

    def __init__(
        self,
        app,
        allow_credentials: bool = True,
        allow_methods: list[str] = None,
        allow_headers: list[str] = None,
    ):
        super().__init__(app)
        self.allow_credentials = allow_credentials
        self.allow_methods = allow_methods or ["*"]
        self.allow_headers = allow_headers or ["*"]

    async def dispatch(self, request: Request, call_next):
        """Handle CORS for the request based on tenant domain."""

        # Get the appropriate CORS origins for this request
        allowed_origins = tenant_manager.get_cors_origins_for_request(request)

        logger.debug(f"Request host: {request.headers.get('host')}")
        logger.debug(f"Allowed origins: {allowed_origins}")

        # Get the origin from the request
        origin = request.headers.get("origin")

        # Handle preflight requests
        if request.method == "OPTIONS":
            if origin and origin in allowed_origins:
                headers = {
                    "Access-Control-Allow-Origin": origin,
                    "Access-Control-Allow-Methods": ", ".join(self.allow_methods),
                    "Access-Control-Allow-Headers": ", ".join(self.allow_headers),
                }
                if self.allow_credentials:
                    headers["Access-Control-Allow-Credentials"] = "true"

                return PlainTextResponse("OK", headers=headers)
            else:
                # Reject preflight if origin not allowed
                return PlainTextResponse("CORS origin not allowed", status_code=403)

        # Process the request
        response = await call_next(request)

        # Add CORS headers to the response
        if origin and origin in allowed_origins:
            response.headers["Access-Control-Allow-Origin"] = origin
            if self.allow_credentials:
                response.headers["Access-Control-Allow-Credentials"] = "true"

        return response
This middleware does more than just handle CORS—it establishes the foundation for tenant-aware request processing. By inspecting the Origin header, it can determine which tenant is making the request and configure the appropriate CORS policies dynamically.
The tenant manager handles the actual domain-to-tenant mapping:
"""
Tenant management utilities for multi-tenant application.
"""

from fastapi import Request
from sqlmodel import Session, select
from app.models import TenantDomain
from app.core.config import settings
from app.core.db import engine

class TenantManager:
    """Manages tenant resolution and configuration."""

    @staticmethod
    def get_tenant_from_domain(domain: str) -> str | None:
        """
        Get tenant ID from a domain name.

        Args:
            domain: The domain name to look up

        Returns:
            Tenant ID if found, None otherwise
        """
        # Remove port if present
        domain = domain.split(":")[0]

        # Query database for tenant domain mapping
        with Session(engine) as session:
            statement = select(TenantDomain).where(TenantDomain.domain == domain)
            tenant_domain = session.exec(statement).first()

            if tenant_domain:
                return str(tenant_domain.tenant_id)

        return None

    @staticmethod
    def get_cors_origins_for_request(request: Request) -> list[str]:
        """
        Get appropriate CORS origins for the current request based on origin.

        Args:
            request: FastAPI request object

        Returns:
            List of allowed CORS origins for this request
        """
        origin = request.headers.get("origin")

        if not origin:
            # Fallback to default CORS origins
            return settings.all_cors_origins

        # Extract domain from origin (remove protocol and port)
        origin_domain = origin.replace("https://", "").replace("http://", "").split(":")[0]

        # Get tenant ID from origin domain
        tenant_id = TenantManager.get_tenant_from_domain(origin_domain)

        # If no tenant found, fallback to default CORS origins
        if tenant_id is None:
            return settings.all_cors_origins

        # Return tenant-specific CORS origins for the frontend domain
        return settings.get_tenant_cors_origins(origin_domain, tenant_id)

# Global instance
tenant_manager = TenantManager()
Now the backend knows which tenant it's dealing with and can interrogate the database for additional configuration. Similar to providing the TenantContext on the frontend, I use FastAPI's dependency injection system to automatically provide tenant information to all routes:
def get_tenant_id(request: Request, session: SessionDep) -> str:
    """
    Extract tenant ID from request origin header.
    Falls back to default 'newroots' tenant if not found.
    """
    # Get origin from request headers
    origin = request.headers.get("origin")

    if origin:
        # Extract domain from origin using urlparse
        parsed_origin = urlparse(origin)
        origin_domain = parsed_origin.netloc.split(":")[0]  # Remove port if present

        # Get tenant ID from origin domain
        tenant_id = tenant_manager.get_tenant_from_domain(origin_domain)

        if tenant_id:
            return tenant_id

    # Fallback to default tenant (newroots)
    default_tenant = session.exec(select(Tenant).where(Tenant.name == "newroots")).first()
    if default_tenant:
        return str(default_tenant.id)

    # If no default tenant exists, raise an error
    raise HTTPException(
        status_code=500, detail="No tenant configuration found. Please contact support."
    )
Using this dependency in a route is straightforward:
@router.post("", response_model=SurveyResultsResponse)
async def create_survey_results(
    profile_data: SurveyResultsSubmission,
    request: Request,
    current_user: User = Depends(get_current_user),
    tenant_id: str = Depends(get_tenant_id),  # <-- new dependency injected
    db_session: Session = Depends(get_db),
):
    # Route logic here with tenant_id available
    pass
Now all backend logic knows which tenant it's dealing with and can query for additional tenant-specific configuration as needed. This approach ensures that every database operation, every report generation, and every email delivery is properly attributed to the correct tenant.
The database design had to support clean multi-tenancy from the ground up. I created Tenant and TenantDomain models to establish the foundation:
# Tenant models for multi-tenancy support
class Tenant(NewrootsTableModel, table=True):
    """Tenant model for multi-tenancy support.

    Tenants represent separate instances or organizations using the platform.
    Each tenant can have multiple domains and owns their own data isolation.
    """

    id: uuid.UUID = Field(
        default_factory=uuid.uuid4,
        primary_key=True,
        description="Unique identifier for the tenant",
    )
    name: str = Field(
        max_length=255,
        description="Display name for the tenant organization",
    )
    logo_local_path: str | None = Field(
        default=None,
        max_length=512,
        description="Local path for logo (for PDF/report generation)",
    )
    logo_url: str | None = Field(
        default=None,
        max_length=1024,
        description="Public URL for logo (GCS/CDN, for email/web use)",
    )

    # Relationships
    domains: list["TenantDomain"] = Relationship(
        back_populates="tenant",
    )

class TenantDomain(NewrootsTableModel, table=True):
    """Domain mapping for multi-tenant routing.

    Maps domain names to specific tenants for request routing.
    Each domain can only belong to one tenant.
    """

    id: uuid.UUID = Field(
        default_factory=uuid.uuid4,
        primary_key=True,
        description="Unique identifier for this domain mapping",
    )
    tenant_id: uuid.UUID = Field(
        foreign_key="tenant.id",
        index=True,
        description="Reference to the tenant that owns this domain",
    )
    domain: str = Field(
        unique=True,
        index=True,
        max_length=255,
        description="Domain name (e.g., 'example.com')",
    )

    # Relationships
    tenant: "Tenant" = Relationship(
        back_populates="domains",
    )
Every resource table in the system then gets a tenant_id foreign key to ensure proper data isolation:
class SurveyResults(NewrootsTableModel, table=True):
    """Survey responses and processing status for relocation assessments.

    Stores user responses to relocation surveys and tracks the processing
    status through the report generation pipeline. Each survey result
    can generate multiple reports and payments.
    """

    __tablename__ = "survey_results"

    id: uuid.UUID = Field(
        default_factory=uuid.uuid4,
        primary_key=True,
        description="Unique identifier for this survey submission",
    )
    user_id: uuid.UUID = Field(
        foreign_key="user.id",
        index=True,
        description="User who submitted this survey",
    )
    tenant_id: uuid.UUID = Field(
        foreign_key="tenant.id",
        index=True,
        description="Tenant that owns this survey result",
    )
    survey_id: str = Field(
        description="Identifier of the survey form that was completed",
    )
    survey_data: dict[str, Any] = Field(
        sa_column=Column(JSON),
        description="Complete survey responses as JSON data",
    )
    status: SurveyResultsStatus = Field(
        default=SurveyResultsStatus.PENDING,
        description="Current processing status of the survey",
    )

    # Relationships
    user: "User" = Relationship(
        back_populates="survey_results",
    )
    tenant: "Tenant" = Relationship()
    payments: list["Payment"] = Relationship(
        back_populates="survey_results",
    )
    reports: list["Report"] = Relationship(
        back_populates="survey_results",
    )
This database design ensures that every piece of data is owned by a specific tenant, making it impossible for data to leak between tenants accidentally. All queries must include the tenant_id filter, and the foreign key relationships make it easy to navigate from any resource back to its owning tenant.
The backend architecture also had to handle tenant-specific configuration for things like email settings, payment processing, and report generation. Rather than hardcoding these values, I store them in the tenant record and load them dynamically based on the detected tenant:
def get_tenant_config(tenant_id: str, session: Session) -> TenantConfig:
    """
    Load complete tenant configuration including branding and settings.
    """
    tenant = session.exec(select(Tenant).where(Tenant.id == tenant_id)).first()
    if not tenant:
        raise HTTPException(status_code=404, detail="Tenant not found")

    return TenantConfig(
        id=str(tenant.id),
        name=tenant.name,
        logo_local_path=tenant.logo_local_path,
        logo_url=tenant.logo_url,
        support_email=tenant.support_email,
        # ... other configuration fields
    )
This approach makes the backend completely tenant-agnostic at the code level. The same business logic handles requests for all tenants, but with tenant-specific configuration loaded dynamically. This is crucial for maintainability—I don't want to have tenant-specific code paths that could diverge over time.
Security was another critical consideration. The backend had to enforce strict data isolation to prevent one tenant from accessing another tenant's data. This meant adding tenant_id filters to every database query and ensuring that API endpoints validate tenant ownership before returning data:
def get_user_survey_results(
    user_id: str,
    tenant_id: str,
    session: Session
) -> list[SurveyResults]:
    """
    Get survey results for a user within a specific tenant.
    Enforces tenant isolation.
    """
    statement = select(SurveyResults).where(
        SurveyResults.user_id == user_id,
        SurveyResults.tenant_id == tenant_id
    )
    return session.exec(statement).all()
By requiring both user_id and tenant_id for data access, the system ensures that users can only see data that belongs to their tenant, even if they somehow gained access to another tenant's user ID. (Note: in systems like Supabase, you can use RLS, protecting your data at the trigger/DB level.)
The backend architecture successfully achieved the goal of tenant-aware services without code duplication. The same FastAPI application handles requests for all tenants, but with complete data isolation and tenant-specific configuration. This approach scales cleanly as new tenants are added and maintains security boundaries that prevent data leakage between tenants.
Report Generation: Dynamic PDF Branding
The report generation system was where the white labeling had to be most precise. Users were paying for these reports, and they expected them to look professional and branded correctly. A report generated through Expatsi had to look like it came from Expatsi—not just with a different logo slapped on top, but with consistent branding throughout the entire document.
I use Pandoc for report generation because nothing typesets as beautifully as LaTeX. Yes, I had to fight endlessly with markdown to PDF table rendering, but the output quality is worth it. My Pandoc templates were previously static files with hardcoded branding. Now, I had to make them dynamic and tenant-aware.
The solution was to convert every static template file into a Jinja2 template that could be evaluated with tenant-specific variables. For example, here's the Pandoc header preamble that controls the overall document styling:
---
book: true

mainfont: "Open Sans"
mainfontoptions:
 - Path=/app/resources/fonts/
 - UprightFont=OpenSans-Regular.ttf
 - BoldFont=   OpenSans-Bold.ttf
 - ItalicFont= OpenSans-Italic.ttf
 - BoldItalicFont=OpenSans-BoldItalic.ttf

sansfont: "Poppins"
sansfontoptions:
 - Path=/app/resources/fonts/
 - UprightFont=Poppins-Regular.ttf
 - BoldFont=   Poppins-Bold.ttf
 - ItalicFont= Poppins-Italic.ttf
 - BoldItalicFont=Poppins-BoldItalic.ttf

monofont: "DejaVu Sans Mono"
monofontoptions:
 - Path=/usr/share/fonts/truetype/dejavu/
 - UprightFont=DejaVuSansMono.ttf
 - BoldFont=   DejaVuSansMono-Bold.ttf
 - ItalicFont= DejaVuSansMono-Oblique.ttf
 - BoldItalicFont=DejaVuSansMono-BoldOblique.ttf

titlepage: true
titlepage-color: "ffffff"
titlepage-text-color: "1b1718"
titlepage-rule-color: "042e49"
title: "{{ tenant.name or 'Newroots' }} Global Fit Report"
subtitle: "Find Your Perfect Place in the World"
titlepage-logo: "{{ tenant.logo_local_path or '/app/app/newroots_report_generator/static/tenants/default/logo-color-hires.png' }}"
toc: true
toc-own-page: true
toc-depth: 1
logo-width: 25mm
author: ["{{ tenant.report_author or 'Your Relocation Advisors' }}"]
date: \today

documentclass: report
header-includes:
 - \renewcommand{\chaptername}{}
 - \renewcommand{\thechapter}{}

# PDF link handling options
colorlinks: true
linkcolor: blue
urlcolor: blue
toccolor: black
# PDF engine options
pdf-engine: xelatex
links-as-notes: false
# Additional options for better rendering
geometry: letterpaper,margin=1in
fontsize: 11pt

keywords: [Relocation, Global, Fit]
...
The key insight here is that Jinja2 template variables like {{ tenant.name }} and {{ tenant.logo_local_path }} get evaluated at report generation time with the actual tenant configuration. This means the same template can produce completely different-looking reports depending on which tenant initiated the request.
The report generation pipeline looks like this:
def generate_tenant_report(
    survey_results: SurveyResults,
    tenant_config: TenantConfig,
    output_path: str
) -> str:
    """
    Generate a tenant-branded PDF report from survey results.

    Args:
        survey_results: The survey data to include in the report
        tenant_config: Tenant-specific branding and configuration
        output_path: Where to save the generated PDF

    Returns:
        Path to the generated PDF file
    """
    # Load the Jinja2 template
    template_loader = FileSystemLoader('/app/templates/reports')
    template_env = Environment(loader=template_loader)
    template = template_env.get_template('global_fit_report.md.j2')

    # Prepare template variables
    template_vars = {
        'tenant': tenant_config,
        'survey_data': survey_results.survey_data,
        'user': survey_results.user,
        'generated_date': datetime.now().strftime('%B %d, %Y'),
        'report_id': str(survey_results.id),
    }

    # Render the markdown content
    markdown_content = template.render(**template_vars)

    # Write to temporary file
    temp_md_path = f"/tmp/report_{survey_results.id}.md"
    with open(temp_md_path, 'w', encoding='utf-8') as f:
        f.write(markdown_content)

    # Generate PDF using Pandoc
    pandoc_cmd = [
        "pandoc",
        "--from",
        "markdown+lists_without_preceding_blankline+pipe_tables",
        "--listings",
        "--template",
        template,
        "--pdf-engine=xelatex",
        processed_markdown_path,
        "-o",
        output_path,
    ]
    # Add header file if requested, using --metadata-file for YAML front matter
    if include_header and header_file and os.path.exists(header_file):
        # Render the header template with tenant context if provided
        if tenant_context:
            rendered_header_file = _render_pandoc_header(header_file, tenant_context)
            cmd.extend(["--metadata-file", rendered_header_file])
        else:
            cmd.extend(["--metadata-file", header_file])
    result = subprocess.run(pandoc_cmd, capture_output=True, text=True)

    if result.returncode != 0:
        raise ReportGenerationError(f"Pandoc failed: {result.stderr}")

    # Clean up temporary file
    os.unlink(temp_md_path)

    return output_path
This function takes survey results and tenant configuration as input, renders the Jinja2 template with tenant-specific variables, and then uses Pandoc to generate a beautifully typeset PDF. The same code works for all tenants, but produces completely different-looking reports based on the tenant configuration.
The template itself contains conditional logic to handle different tenant requirements:
# {{ tenant.name }} Global Fit Report {% if tenant.report_subtitle %} ## {{ tenant.report_subtitle }} {% else %} ## Find Your Perfect Place in the World {% endif %} --- **Prepared for:** {{ user.full_name }} **Report ID:** {{ report_id }} **Generated:** {{ generated_date }} **By:** {{ tenant.report_author or 'Your Relocation Advisors' }} {% if tenant.contact_email %} **Questions?** Contact us at [{{ tenant.contact_email }}](mailto:{{ tenant.contact_email }}) {% endif %} --- ## Executive Summary Based on your responses to our comprehensive relocation assessment, we've analyzed your preferences across {{ survey_data.dimensions_analyzed }} cultural and lifestyle dimensions. This report presents our findings and recommendations for countries that align with your priorities and circumstances. {% if tenant.methodology_note %} ### {{ tenant.name }} Methodology {{ tenant.methodology_note }} {% endif %} ## Your Profile {% for section in survey_data.profile_sections %} ### {{ section.title }} {{ section.content }} {% if section.chart_data %}  {% endif %} {% endfor %}
The conditional blocks allow different tenants to include or exclude sections, customize messaging, and add their own methodology notes. This flexibility ensures that each tenant can tailor the report content to match their brand voice and positioning.
The report generation system successfully achieved the goal of dynamic PDF branding. The same template and generation code produces completely different-looking reports based on tenant configuration, while maintaining the high typographic quality that users expect from a premium product. The fallback mechanisms ensure reliability even when tenant assets are missing or malformed.
Email System: MJML Template Magic
Email was the final piece of the white labeling puzzle, and in many ways the most important. When someone purchases a report through a partner, the email they receive is often their first direct communication from the system and it has their report attached. If that email has the wrong branding or feels generic, it undermines the entire white label experience. Here’s what the email looks like:
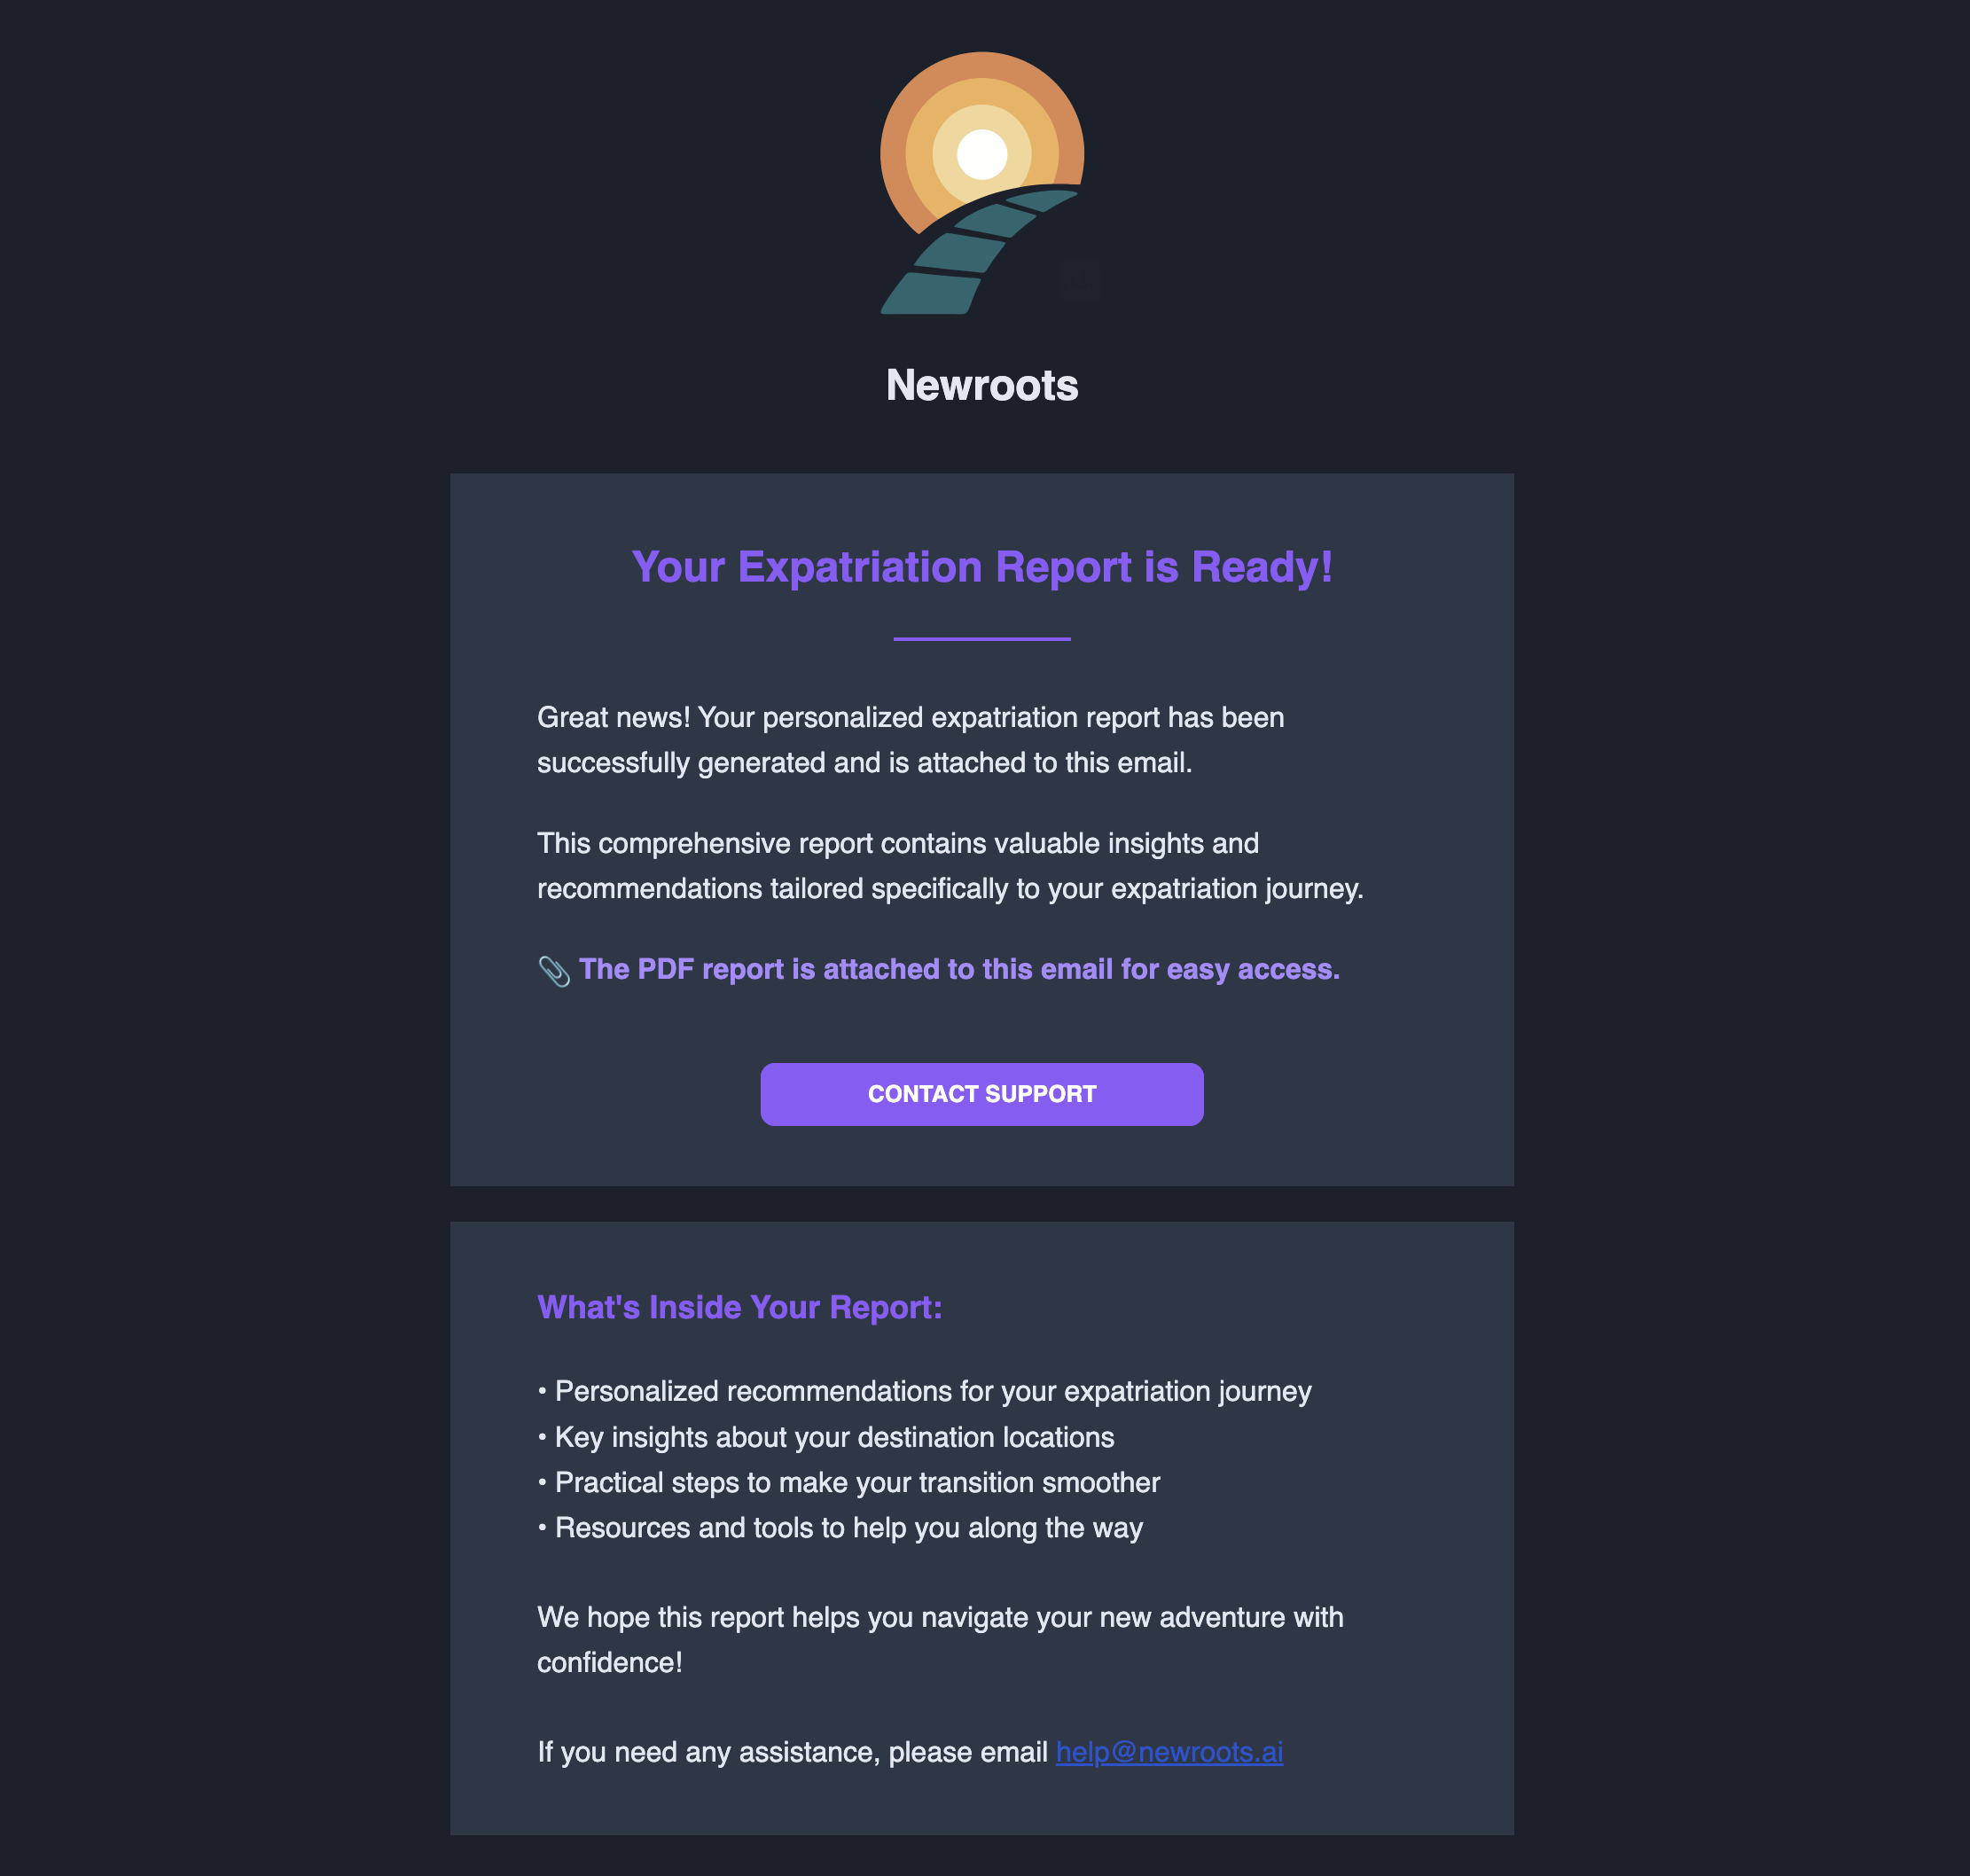
I already used MJML for email templating because it produces beautiful, responsive emails that work across all email clients. MJML handles the complexity of email HTML/CSS compatibility, so I can focus on design and content rather than fighting with Outlook's rendering quirks.
The challenge was making these templates tenant-aware without duplicating the email codebase. The solution was similar to the PDF approach—convert static MJML templates into Jinja2 templates that could be evaluated with tenant-specific variables.
Here's what the tenant-aware email template looks like:
<mjml>
  <mj-head>
    <mj-preview>Your personalized relocation report is ready and attached to this email. Here's to your new beginnings!</mj-preview>
    <mj-attributes>
      <mj-all font-family="'Inter', 'Helvetica', Arial, sans-serif" />
      <mj-text font-size="16px" color="#E2E8F0" line-height="1.6" />
      <mj-section padding="0px" />
      <mj-divider border-color="#8B5CF6" border-width="2px" />
    </mj-attributes>
    <mj-style>
      .header-image { border-radius: 8px; }
      .link-text { color: #A78BFA; text-decoration: underline; }
      .rounded { border-radius: 0.5rem; }
      .shadow { box-shadow: 0 4px 6px -1px rgba(0, 0, 0, 0.1), 0 2px 4px -1px rgba(0, 0, 0, 0.06); }
    </mj-style>
  </mj-head>
  <mj-body background-color="#1A202C">
    <!-- Header with Logo -->
    <mj-section padding="20px 0">
      <mj-column>
        <!-- Logo image with subtle border -->
        <mj-image
          width="450px"
          src="{{ tenant.logo_url or 'https://storage.googleapis.com/newroots-public/logo-wide.png' }}"
          alt="{{ tenant.name or 'Newroots' }} Logo"
          border-radius="8px"
        />
      </mj-column>
    </mj-section>

    <!-- Main Content -->
    <mj-section
      css-class="rounded shadow"
      background-color="#2D3748"
      padding="24px"
    >
      <mj-column>
        <mj-text
          font-size="24px"
          font-weight="bold"
          color="#8B5CF6"
          align="center"
        >
          Your Relocation Report Is Ready
        </mj-text>

        <mj-divider width="100px" padding="10px 0" />

        <mj-text padding-top="20px">
          Your personalized relocation report is now ready and attached to this
          email. We've analyzed your preferences and needs to provide you with
          clear, actionable insights.
        </mj-text>

        <mj-text>
          This report offers fact-based guidance tailored to your unique
          situation, helping you make informed decisions about your next steps.
        </mj-text>

        <mj-text font-weight="bold" color="#A78BFA">
          📎 Your PDF report is attached for easy reference
        </mj-text>

        <mj-spacer height="20px" />

        <!-- Contact Support Button -->
        <mj-button
          background-color="#8B5CF6"
          color="#FFFFFF"
          border-radius="0.5rem"
          font-weight="bold"
          href="mailto:{{ tenant.support_email or 'help@newroots.ai' }}"
          width="250px"
        >
          GET SUPPORT
        </mj-button>
      </mj-column>
    </mj-section>

    <!-- Footer -->
    <mj-section padding-top="20px" padding-bottom="20px">
      <mj-column>
        <mj-text
          font-size="12px"
          color="#718096"
          align="center"
          padding-top="10px"
        >
          © 2025 {{ tenant.name or 'Newroots AI' }}. All rights reserved.
        </mj-text>
      </mj-column>
    </mj-section>
  </mj-body>
</mjml>
The key elements that make this template tenant-aware are the Jinja2 variables scattered throughout: {{ tenant.logo_url }}, {{ tenant.name }}, and {{ tenant.support_email }}. When the email is generated, these get replaced with the actual tenant configuration values.
The email generation pipeline looks like this:
def send_tenant_branded_email(
    recipient_email: str,
    tenant_config: TenantConfig,
    report_attachment_path: str,
    email_type: str = "report_delivery"
) -> bool:
    """
    Send a tenant-branded email with report attachment.

    Args:
        recipient_email: Email address to send to
        tenant_config: Tenant-specific branding and configuration
        report_attachment_path: Path to the PDF report to attach
        email_type: Type of email template to use

    Returns:
        True if email was sent successfully, False otherwise
    """
    try:
        # Load the MJML template
        template_loader = FileSystemLoader('/app/templates/emails')
        template_env = Environment(loader=template_loader)
        mjml_template = template_env.get_template(f'{email_type}.mjml.j2')

        # Prepare template variables
        template_vars = {
            'tenant': tenant_config,
            'recipient_email': recipient_email,
            'report_filename': os.path.basename(report_attachment_path),
            'generated_date': datetime.now().strftime('%B %d, %Y'),
        }

        # Render the MJML content
        mjml_content = mjml_template.render(**template_vars)

        # Convert MJML to HTML
        html_content = mjml_to_html(mjml_content)

        # Create email message
        msg = EmailMessage()
        msg['Subject'] = f"Your {tenant_config.name} Global Fit Report is Ready"
        msg['From'] = tenant_config.support_email or 'reports@newroots.ai'
        msg['To'] = recipient_email

        # Set HTML content
        msg.set_content(html_content, subtype='html')

        # Attach PDF report
        with open(report_attachment_path, 'rb') as f:
            pdf_data = f.read()
            msg.add_attachment(
                pdf_data,
                maintype='application',
                subtype='pdf',
                filename=f"{tenant_config.name}_Global_Fit_Report.pdf"
            )

        # Send email
        with smtplib.SMTP(SMTP_HOST, SMTP_PORT) as server:
            server.starttls()
            server.login(SMTP_USERNAME, SMTP_PASSWORD)
            server.send_message(msg)

        logger.info(f"Email sent successfully to {recipient_email} for tenant {tenant_config.id}")
        return True

    except Exception as e:
        logger.error(f"Failed to send email to {recipient_email} for tenant {tenant_config.id}: {e}")
        return False
This function handles the complete email generation and delivery process. It renders the MJML template with tenant variables, converts it to HTML, creates an email message with the appropriate headers and attachment, and sends it via SMTP.
Testing the email system required sending emails to multiple test addresses and manually verifying that the branding was applied correctly. I manually checked each outbound email for correct logos, company names in the footer and subject line, support email addresses, and absence of any "Newroots" branding in white-labeled versions. MJML handled most of the responsive design beautifully, and the dynamic template logic held up under testing. Locally I had mailcatcher running which allowed me to intercept outbound emails, testing send w/o bothering your clients. Amazing.
Testing & Validation: Proving It Works
Building a white label system is one thing—proving that it actually works correctly across all tenants and edge cases is another. With only a week to ship, I needed a testing strategy that would give me confidence in the system without taking days to execute.
The testing approach had to cover several critical areas: end-to-end tenant detection and branding, PDF generation with correct tenant assets, email delivery with proper branding, data isolation between tenants, and graceful handling of edge cases like missing assets or malformed configurations.
I have tests in place. But, for this document I’ll show you a different approach.
I started with end-to-end testing using a simple Bash script that could simulate requests from different tenant domains. This script would log in, grab a JWT token, and trigger report generation for multiple tenants to verify that the complete flow worked correctly:
#!/bin/bash

# Test script for multi-tenant report generation
set -e

API_BASE="http://localhost:8000/api/v1"
TEST_USER_EMAIL="test@example.com"
TEST_PASSWORD="testpassword123"

echo "Starting multi-tenant report generation test..."

# Login and get JWT token
echo "Logging in..."
JWT_RESPONSE=$(curl -s -X POST "$API_BASE/auth/login" \
  -H "Content-Type: application/json" \
  -d "{\"email\": \"$TEST_USER_EMAIL\", \"password\": \"$TEST_PASSWORD\"}")

JWT_TOKEN=$(echo $JWT_RESPONSE | jq -r '.access_token')

if [ "$JWT_TOKEN" = "null" ]; then
  echo "Failed to get JWT token"
  exit 1
fi

echo "Got JWT token: ${JWT_TOKEN:0:20}..."

# Test report generation for Newroots tenant
echo "Testing Newroots tenant..."
NEWROOTS_RESPONSE=$(curl -s -X POST "$API_BASE/reports/generate-report" \
  -H "Origin: http://localhost:3000" \
  -H "Authorization: Bearer $JWT_TOKEN" \
  -H "Content-Type: application/json" \
  -d '{
    "survey_results_id": "test-survey-123",
    "product_tier_name": "bronze",
    "user_email": "user@newroots.ai",
    "send_email": true
  }')

echo "Newroots response: $NEWROOTS_RESPONSE"

# Test report generation for ExpatsiGo tenant
echo "Testing ExpatsiGo tenant..."
EXPATSIGO_RESPONSE=$(curl -s -X POST "$API_BASE/reports/generate-report" \
  -H "Origin: http://expatsigo.com" \
  -H "Authorization: Bearer $JWT_TOKEN" \
  -H "Content-Type: application/json" \
  -d '{
    "survey_results_id": "test-survey-456",
    "product_tier_name": "bronze",
    "user_email": "user@expatsigo.com",
    "send_email": true
  }')

echo "ExpatsiGo response: $EXPATSIGO_RESPONSE"

# Test with unknown tenant (should fallback to default)
echo "Testing unknown tenant fallback..."
UNKNOWN_RESPONSE=$(curl -s -X POST "$API_BASE/reports/generate-report" \
  -H "Origin: http://unknown-domain.com" \
  -H "Authorization: Bearer $JWT_TOKEN" \
  -H "Content-Type: application/json" \
  -d '{
    "survey_results_id": "test-survey-789",
    "product_tier_name": "bronze",
    "user_email": "user@unknown.com",
    "send_email": true
  }')

echo "Unknown tenant response: $UNKNOWN_RESPONSE"

echo "Multi-tenant test completed!"
This script confirmed several critical behaviors: the correct tenant was resolved based on the Origin header, the resulting PDFs used the tenant's logo and branding, emails were sent with appropriate tenant branding, fulfillment notifications included tenant metadata, and reports were properly linked to the tenant in the database.
The testing and validation process gave me confidence that the white label system would work correctly in production. The combination of automated testing, manual verification, edge case handling, and performance validation ensured that the system could handle real-world usage patterns while maintaining clean separation between tenants.
Lessons Learned: Shipping Under Pressure
Building a white-label platform in under a week taught me plenty about architecture, product trade-offs, and staying sane under pressure.
Design First, Hack Later
The best decision I made was to treat core components—like TenantConfig, template rendering, and tenant detection—as clean abstractions from the start. I could’ve hardcoded logic for each tenant, but spending a few extra hours up front saved days of future refactoring. Making the choice to stick with a single deployment was best.
Instead of if tenant == "expatsigo" littered everywhere, I had a declarative config file. That config controlled logos, fonts, colors, enabled routes, and analytics settings—everything needed to make a tenant feel bespoke. This made it possible to add new tenants with zero code changes.
The same went for templating. Moving from static files to Jinja templates was extra work, but it gave me long-term flexibility. No template duplication. No version drift. Just one set of templates that work for everyone.
Font Hell
Fonts were sneakily complex. Each tenant had their own, but different environments rendered them differently: web needed Google Fonts; PDFs needed local .ttf files; emails needed web-safe fallbacks. Managing three formats per font was non-negotiable for consistent branding.
Data Isolation by Default
Adding tenant_id to every table from day one paid off. Trying to retrofit multi-tenancy later would’ve been a mess. This decision gave me data separation, clean analytics, and fewer edge cases to debug.
Fallbacks Save the Day
Things break. Logos go missing. Fonts fail to load. Email addresses get misconfigured. Every major touchpoint had fallbacks: default logos, safe fonts, a backup support email. These didn’t just prevent crashes—they prevented support tickets.
Test What Matters
With little time for exhaustive unit tests, I focused on end-to-end flow validation. A Bash script hitting both tenants, verifying PDFs and email output, gave me confidence faster than 100% test coverage ever would.
Observability = Peace of Mind
I added tenant IDs to every log, fulfillment email, and debug output. This made diagnosing production issues straightforward. If a report went sideways, I could immediately see what tenant, what user, and where the breakdown happened.
Local Dev Workflow
Multi-tenancy complicates testing. That’s why I built a local dev switcher that let me toggle tenants at runtime without updating my hosts file or redeploying. It quickly became indispensable.
Architecture is Leverage
The result of these decisions? I could onboard new partners in hours. Custom branding, flexible pricing, tailored features—all possible from a single codebase. Observability made analytics and troubleshooting simple. Clean data isolation prevented mix-ups.
Constraints Fuel Creativity
Having just a week forced clarity. I had to decide what really mattered. It led to simpler, more elegant solutions—and avoided bloat.
The system not only shipped, but became the foundation for scalable growth. Tight timelines and clear goals didn’t hurt quality—they made it.
Turns out, building under pressure—when done right—can produce some of your best work.
Conclusion: From Prototype to Production
What started as a simple request to "make the reports look like they came from our brand" turned into a comprehensive exploration of multi-tenant architecture, dynamic branding, and system design under pressure. In less than a week, I transformed Newroots from a single-brand product into a fully white-label platform that could serve multiple partners seamlessly.
Looking back, the week-long timeline was both a constraint and an advantage. It forced me to focus ruthlessly on what was essential, which led to a cleaner and more focused solution than I might have built with unlimited time. It also created urgency that prevented over-engineering and analysis paralysis. Sometimes the best systems emerge from clear requirements and tight deadlines—the pressure forces you to identify what really matters and build only what's necessary.
Acknowledgments
This project wouldn't have been possible without the incredible ecosystem of tools and technologies that made rapid development feasible. Each of these tools solved complex problems elegantly, allowing me to focus on the business logic rather than reinventing foundational capabilities.
FastAPI provided the perfect foundation for the backend architecture. Its automatic API documentation, built-in dependency injection, and excellent async support made it possible to build a robust, scalable API quickly. The type hints and Pydantic integration caught countless bugs before they reached production.
DaisyUI was instrumental in making the dynamic theming system work seamlessly. Its CSS-only approach and comprehensive component library meant I could focus on tenant logic rather than wrestling with CSS frameworks. The data-theme attribute system was perfect for runtime theme switching.
Claude by Anthropic served as an invaluable coding partner throughout this project. From debugging complex Jinja2 templates to optimizing database queries, having an AI assistant that could understand context and provide thoughtful suggestions accelerated development significantly.
Mailcatcher already mentioned above.
Manus provided the development environment and tooling that made rapid iteration possible. The seamless integration between local development and cloud deployment removed friction from the development workflow. (Manus also helped edit this document, which ChatGPT was woefully incapable of doing.)
Pandoc and LaTeX handled the complex PDF generation requirements beautifully. While the learning curve was steep, the typographic quality and flexibility of the output justified the investment. No other toolchain could have produced reports that looked this professional.
Google Cloud Run provided the scalable, serverless deployment platform that could handle variable tenant loads without requiring complex infrastructure management. The automatic scaling and pay-per-use model was perfect for a multi-tenant system with unpredictable traffic patterns.
Cloudflare handled DNS management, SSL termination, and CDN services across all tenant domains. Their API made it possible to automate domain setup for new tenants, and their global network ensured fast performance regardless of where users were located.
Mermaid and PlantUML were essential for documenting the system architecture and creating diagrams that helped communicate complex relationships to stakeholders. Visual documentation became crucial as the system grew in complexity.
Each of these tools represents years of development effort by dedicated teams, and their quality and reliability made it possible to build something sophisticated in a very short timeframe. The modern development ecosystem is truly remarkable in what it enables.
Work With Me
If this kind of rapid system development resonates with you, I'd love to help with your next challenge. I specialize in transforming complex business requirements into elegant technical solutions, often under tight deadlines and with significant constraints.
I excel at building rapid prototypes and proof-of-concepts that validate ideas quickly and cost-effectively. Whether you need to test a new business model, explore technical feasibility, or demonstrate value to stakeholders, I can help you build something tangible in days or weeks rather than months.
I also lead and build high-performing engineering teams that can execute on ambitious technical visions. From establishing development processes and architectural standards to mentoring developers and scaling organizations, I've helped companies grow from startup chaos to enterprise-grade engineering practices.
My approach combines deep technical expertise with business pragmatism. I understand that perfect code doesn't matter if it doesn't solve real problems, and I'm skilled at finding the right balance between technical excellence and business velocity.
As you can tell, though, I’m not a marketer. Who puts their CTA after such a wall of text? :-)
Recent projects include:
•Multi-tenant SaaS platforms with complex customization requirements
•Agentic AI-powered applications that create structured datasets from unstructured sources
Agentic RAG pipelines
I work with:
•Startups that need to move fast and validate ideas quickly
•Scale-ups that are outgrowing their initial technical architecture
•Enterprises that want to adopt modern development practices
•Technical leaders who need an experienced partner for complex projects
If you're facing a challenging technical problem, working under tight deadlines, or need to build something that doesn't quite fit existing solutions, let's talk. I thrive on the kinds of problems that require creative thinking, rapid execution, and solid engineering fundamentals.
Get in touch at https://heavychain.org or connect with me on LinkedIn to discuss how we can work together.